Up-cycling furniture is so fun to do, most of the time it is also much better environmentally than buying new. This process can be done with a piece you already or you can go looking. Some projects will be easy to complete in a day and others may take much longer depending on the piece.
Choosing the furniture
If you haven’t already got a piece of furniture that you want to up-cycle, then you will need to. I find pieces that have been thrown out and left on street-side all of the time, sometimes I am up for the challenge, in this case, I first check for ‘woodworm.
Woodworm makes the wood look like it has lots of little holes, you do not want to bring this into your home as it can spread to your other wooden furniture. Assuming that the furniture does not have woodworm and is made from solid wood, I get it home and study why it has been thrown out.
When I refer to solid wood, this means that the wood is not made from MDF, chipboard and does not have wooden veneer strips on it. If the piece of furniture is not solid wood then it should not be sanded as it could be harmful to your lungs and should not be glued because most of the time it will not work seeing as MDF is made from glued compressed sawdust and chipboard is made from compressed glued wooden chips.
If the piece is damaged you will need to judge whether this can be fixed or not. With chairs I find that commonly the legs are either wonky or broken, the chair is looking distressed or is very dirty. The best case of action relies on the specific issue.
How to fix broken furniture
When bringing any piece of furniture into your home, you should first clean it all over with warm soapy water. Once it is clean, you can then start to repair. Broken legs can be easily mended with commercial wood glue and clamps. The glue usually dries completely clear so you will not need to worry about the visual aesthetics too much. Most of the time the legs can be repaired but sometimes they can't.
To fix a broken piece of wood or leg, you will need to put some wood glue on one piece that you want to bond to the other, using a clamp to ensure it is a tight fit. You should let the glue dry according to the manufacturer's instructions, it is usually 24 hours for a strong bond but some can fix earlier.
I like to clamp the leg in place, all glued, and then to quickly whilst still wet give it quicksand by hand with a course paper. If done correctly this will fill in the crack/join with sawdust which once dry will look very natural and makes the damage unnoticeable.
How to make furniture look nicer aesthetically
Once dry, if the wood is looking very dull, has signs of water damage, or looks worn out, worn off: has flakey paint, wood finish is marked, has scratches, or is dented.
Go around the whole piece with sandpaper always going with the grain to avoid further scratches, your goal here is to smoothen it out, removing the old finish to get it back to its clean wood state, removing all old paint, oil finish, sharp edges, getting rid of scratches, and indents. If sanding the old furniture ensure to wear all safety personal protection equipment such as gloves, respiratory mask, etc.
To remove the dust from sanding, get a damp cloth and give it a once over. After it has dried add linseed, avocado or olive oil to the cloth and give it a once over. This will provide a beautiful finish, it will bring out the natural character of the wood, knots etc or alternatively you can paint the furniture piece with an appropriate paint however I like to always keep it as natural.
Health and safety when up-cyling furniture
Always be careful when and if using power tools using appropriate protection at all times, use gloves when handling wood in case of splinters, and always wear a dust mask when sanding things to protect your lungs. Do not sand any wood that you do not know anything about, research should be carried out beforehand if in doubt consult a professional.
According to GOV - Under current legislation softwood dust, hardwood dust and formaldehyde are considered to be hazardous to health. Both softwood and hardwood dust are known to be respiratory sensitisers and may cause asthma and other respiratory problems. Hardwood dust can also cause disease and illness.
Essential Woodworking Tools
These seven tools are absolute essentials when it comes to wood-working. I would recommend all of them for up cycling your projects, and I’ll be sharing why they are needed.

Wood glue is amazing, it creates a bond that is stronger than the wood itself and dries completely clear. It can help bond wood together or be used to strengthen joints. It can also be used to fill holes in wooden planks. To do this simply put a little glue into the hole and go over it with sandpaper.

Sandpaper is like magic, and nothing is more pleasing than taking a rough piece of wood that is sharp and turning it soft with sandpaper. It can be used in a variety of different ways. It is a versatile tool that can help you remove imperfections and in some cases can even improve the look of wooden furniture that has some water damage.
-
PPE
Dust masks go hand in hand with sandpaper, sanding causes a lot of dust and so you should always protect your lungs for those small fibers. Gloves should be used when necessary to avoid cutting your hands, and eyewear to protect your eyes. Your health is always the most important thing.
Mask | Safety Specs | Gloves

A handsaw is a must-have when working with wood, use it to cut wood from your project or to cut new pieces that will be added. Make sure to use the full width of the blade to make sawing easier, but also if you don’t, over time the saw will have blunt sections of the saw, making it unusable. Using a handsaw is super tiring but it is a great workout too.
These are extremely useful in most situations, they can be used for removing staples, and other undesirable materials. What makes them so great is how the long pointed end allows them to get into the most inaccessible places. This multipurpose tool may not be needed for your project but it’s always a good one to have on hand just in case. I couldn’t have transformed these chairs without it.

When you can’t remove things with the pliers above, a hammer can be used to bash them right in instead. This is not preferred but it can help your pieces go from sharp and dangerous to safe and rustic. Not only that the back of a hammer is super useful for removing nails and has much more power than the pliers.

When the glue isn’t strong enough, you may need a drill and some screws to connect pieces of wood together for your project. Not only that, but you can also make holes if necessary and can use the drill on the reverse setting to remove unwanted screws. Remember to fill them in using the sandpaper and glue. There are thousands of drill attachments which means you will always be prepared for any new project that comes your way.
Our Furniture Up-cycle Projects for Inspiration
I have made plenty of wood products to reduce waste and recycle wood. If I didn't make these, the wood have been dumped into landfill which is why we choose to do in house carpentry using wood scraps and list them on our website for sale. If the link is no longer clickable, this means that the one off product has sold out and is not available for purchase. However feel free to save this page to your favourite and check back regularly for new finds!
1. Solid Pine Controller Box
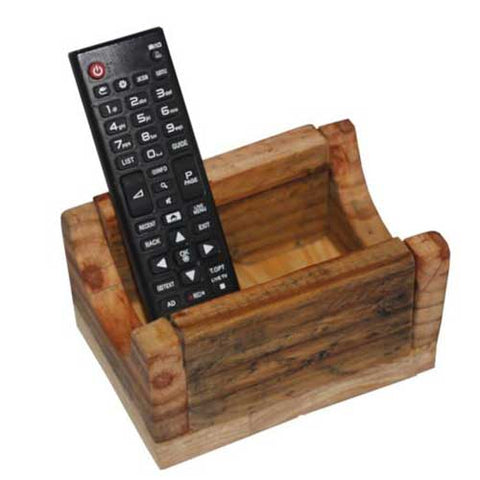
This fancy box has a ton of character and has a nice story too! It was once a cot for both our children, we tried to sell the cot for months and had no interest so I set to work to create this stunning but simple piece!
2. Solid Pine Rustic Coasters (set of four)

This was also solid pine from the cot, but now it is a set of four rustic chunky coasters, that will look beautiful on your table, featuring a golden colour, and an offshape circle design!
3. Pallet Wood Toilet Roll Holder

We see many pallets go into skips every month, why? You can make almost anything with pallet wood, it features a dark colour and here we combine it with pine to create a simple but elegant toilet roll holder. It is tall enough to fit three regular size rolls, adding a ton of character and a country feel to your home. What makes it special? It has been made using materials that would have otherwise ended up in landfills, buying recycled over new means that we are doing more for our environment, and not conforming to mass-produced generic products.
Making recycled products means doing your bit for the planet, there's only one of these and won't be another like it. Unfortunately though, this one off piece is out of stock.
4. Norweigan Spruce Elephant Figure

This elephant was hand carved from a Norweigan spruce Christmas tree's root! It was a personal item that I made myself, this is my first hand carving project.
5. Rustic side table
I love the idea of taking something that someone considers trash and turning it into something new, rustic, and wonderful. On top of that, I love a great project. When I first saw four of these battered chairs outside by a bin, with bits of leather missing, and the discoloured wooden legs, I felt extremely excited.

Maybe some people would see them as rubbish, and considering what they are supposed to look like in there new state, I’d agree on some level. The truth is though, that It’s very easy to see them as that way.
They have definitely seen better days, but I couldn’t let these be taken to the dump, I had to make something with them. I looked at them plenty and didn’t know what to make and so I decided to strip away all of that leather.

When I first started the process, I regretted it simply because it was a lot of hard work but with the end goal in mind to reduce waste and make something stunning. That was enough for me to build a little momentum and keep ongoing.
When I removed all of the leather, it hit me, what if I could upcycle the wood to make it look nice again? That’s exactly what I did. After removing all of the foam, there was somewhat of a hole in the bottom and so It was the perfect time to get some of that wood of those pallets I had been collecting for weeks and put it to good use.

As it was still completely sturdy, it still made for a great chair but I wanted to make it a piece of furniture that would be very useful in the home. A chair is limited to just one use. With all of this in mind, I set out to make a side table that could be used as a chair or stool.
I knew by using pallet wood, it would look bespoke and different from what you normally see. I sanded all of the wood well with sandpaper and then went ahead and chopped the wooden boards to size then to fix It to the Frame I used a strong wood glue by Evostik.

This project was extremely difficult, but I am sharing it because I want to show you how rewarding it can be. I want to encourage you to start your own DIY projects because it reduces waste, and will even save you money. Turning a battered old chair into a stunning side table is just the start. I made four of these beauties, and they all have their place in my home.
See the full process of making here in this video:
Up next: How to Make Wooden Candle Holders


